Saturday, February 28, 2015

Organized Snack Cabinet


YouTube Video 


Hi everyone! So today I wanted to share with you how I created an "ORGANIZED SNACK CABINET" in my house. I have had this SNACK CABINET set up for about five years now in my house and it works great! Having a designated and ORGANIZED space to house all our SNACKS makes packing lunches easier and the kiddos are able to get their own PREPACKED SNACKS by themselves.


I got this cabinet from Target awhile back and it was the perfect space to house all the snacks. 


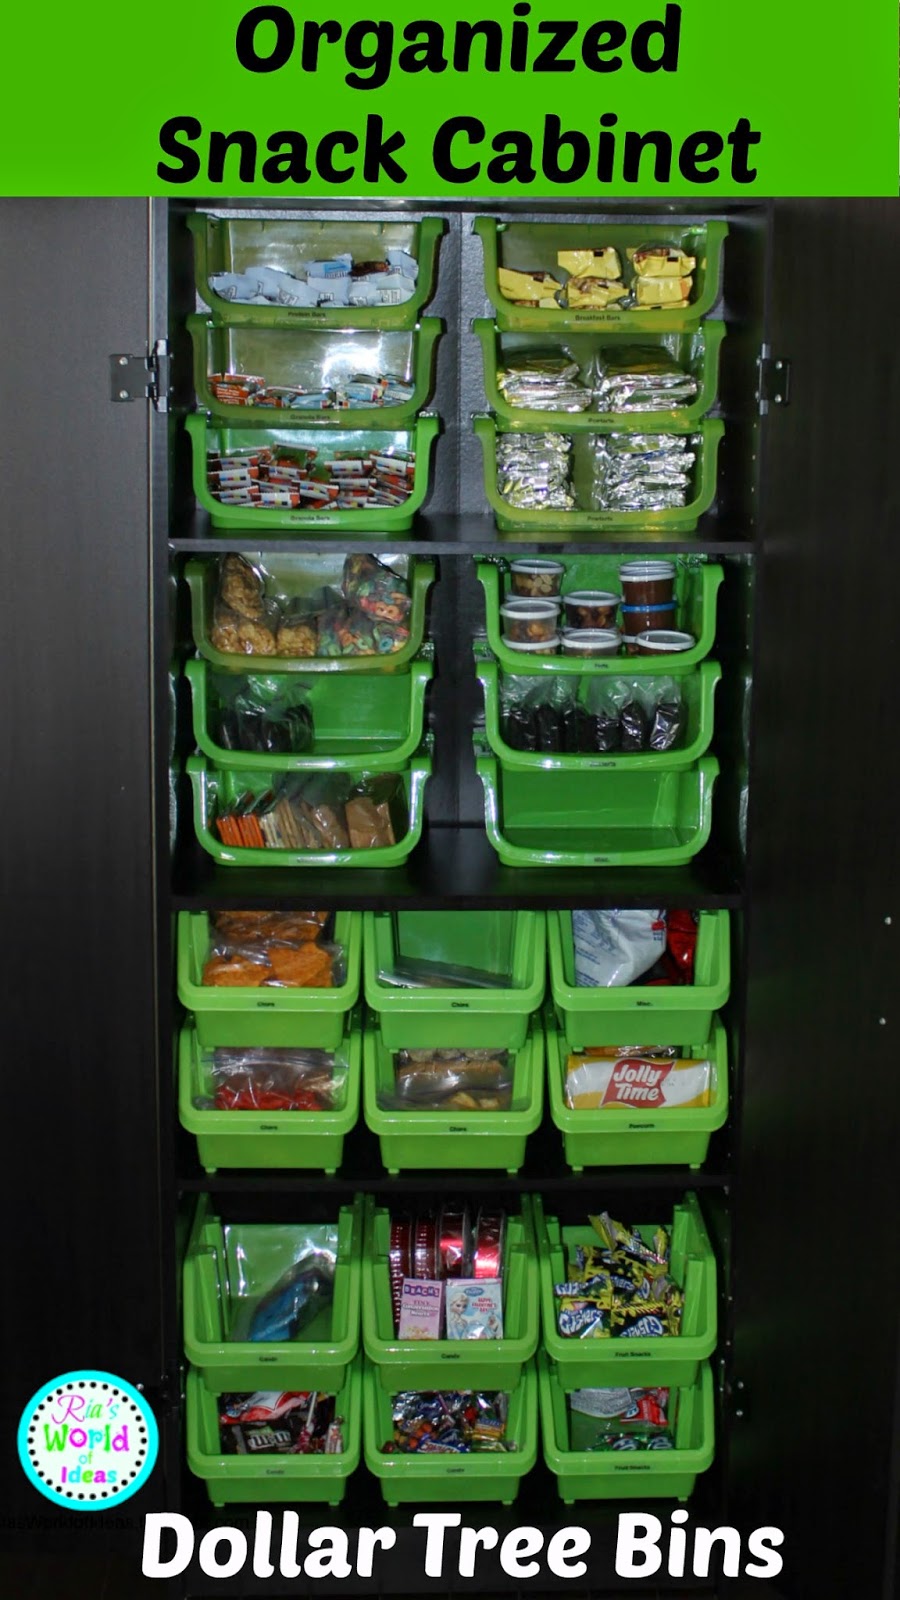
These are the bins I used to ORGANIZE the SNACK CABINET and you can get them at DOLLAR TREE. They have all sorts of colors for these bins.


Here is how the cabinet looks on the inside. I know it looks like a lot of JUNK FOOD but we really don't eat a lot of these SNACKS in one sitting. I have a lot of these SNACKS because I do coupon so I do stock up on our SNACKS when I get a good price on them and keep them in here.


The first shelf is where we have our protein bars, granola bars, breakfast bars, and poptarts. I keep the poptarts in the SNACK CABINET because my girls like to eat them more as a dessert than for breakfast. I used my label maker with the clear label tape to label the bins.


The second shelf is where we keep prepacked dry cereal bags, cookies, crackers, nuts, and desserts. I also have a bin that is labeled misc. for when we a have a certain snack that does not fall into any of these other categories.


On the third shelf is where we keep the chips, popcorn, and another bin (labeled misc.) that we keep beef jerky bags and sunflower seeds bag in.


The last shelf is where we keep our candy and fruit snacks. The girls get candy from Halloween, Christmas, Valentine's Day, and parties and we put them into these bins for them to eat little by little instead all in one sitting LOL.

I hope this post helps some of you or gave you some ideas on how to ORGANIZE your SNACKS or even giving you ideas on how to ORGANIZE other things in your house with this method. Also remember you don't have to spend much to get ORGANIZE because I found all these bins that fit perfectly all at DOLLAR TREE. You don't even need to buy the cabinet that I used from Target, you can do this same ORGANIZATION idea in a part of your own pantry or cabinet in your kitchen. What are some ways you organize your SNACKS? Leave me your comments below. I love to read new ideas from others! :-)

xoxo
Ria

Friday, February 27, 2015

Fluffy Play Snow


Hi again everyone! I have another FUN WINTER ACTIVITY to share with you guys today to do with your kiddos during these SNOW DAYS! With this activity you can create some indoor SNOW PLAY to do with your kiddos.


The materials you need are:

  • Two 16 oz. boxes of Cornstarch
  • One can of shaving cream
  • Glitter (Optional)

Mix all the materials together in a large container for the kiddos to play in.


Keep mixing until you can form a SNOW BALL then the SNOW is ready to play with.


I gave the girls some measuring cups and small bowls from the DOLLAR TREE to use to build and create things in their SNOW.

This SNOW PLAY was a great indoor SENSORY SNOW PLAY. What are some WINTER ACTIVITIES that you are doing with your kiddos during these SNOW DAYS? Let me know in the comments below.

xoxo
RIA


Thursday, February 26, 2015

Snowman Puffy Paint


Hi everyone! I don't know about you guys but we have been having A LOT of SNOW DAYS here at my house which of course my girls LOVE! School has been out and even though the girls LOVE to play in the SNOW they only play for a certain amount of time because they get cold and want to come back inside and I don't blame them. So to keep them busy I set up this ART ACTIVITY  for the girls that I found on PINTEREST to do to go with all this snow we are having. The cool thing about this SNOWMAN PUFFY PAINT is that the paint puffs up when it dries.


The materials you need are:
  • Shaving Cream
  • Glue
  • Glitter (optional)

To make the paint you just mix equal parts of glue and shaving cream together in a bowl. You can add glitter to the top of the paint to make it SPARKLE but you don't have to do this step.


Whenever I do a painting project with my girls, I give them a large paper bag to paint on because they are big and free from the store. I also gave them some craft items to use to create their SNOWMAN.


Here is one my girl's master piece!!


This paint is easy to set and clean up and my girls enjoyed it. What are you doing to keep your kiddos busy during these SNOW DAYS? Leave me a comment below!

XOXO
RIA

Friday, February 6, 2015

Valentine's Day: Heart Letter Match


Here is a FUN VALENTINE'S DAY: HEART LETTER MATCH activity that I found on childcareland.com (click on the link to take you to the website) to help your little ones with LETTER RECOGNITION. Childcareland.com has so many LEARNING and CRAFT activities for kids with different themes and HOLIDAY material. Go check out her website. I found so many great learning activities from her web page.


On her website she has printables with heart shapes and squares with upper and lower case letters to print. I printed out the HEARTS on color contact paper and the letters on white contact paper. I then glued the letters to the back of the HEARTS and laminated them. You can also make these yourself by making your own HEART shape template in Microsoft word and just writing the letters on the back of the HEARTS with a black SHARPIE marker.


I didn't want to overwhelm Bri with so many letters so I split the stack of letters in half so that she would be matching 13 letters at a time instead of 26. Then I just laid them out just like a regular MEMORY MATCH GAME. When she found the matching upper and lower case letters I would ask her to tell me the LETTER and sound of the letter before she moved on to the next letter. This LETTER MATCH game can be done with a parent but it can also be a LEARNING GAME that the child can do by themselves.

Let me know in the comments below what is your favorite or fun VALENTINE'S DAY LETTER RECOGNITION ACTIVITY. I LOVE seeing new ideas!!

XOXO
RIA

Thursday, February 5, 2015

Valentine's Day: Heart Gems Counting


Since we are in the month of FEBRUARY I have started to do VALENTINE'S DAY THEME LEARNING ACTIVITIES with my youngest. Even though she is in KINDERGARTEN now I still like to do NUMBER and LETTER RECOGNITION ACTIVITIES with her after school. This VALENTINE'S DAY: HEART GEMS COUNTING is a MATH COUNTING ACTIVITY that Bri loved to do last year when I was teaching her PRE-K LEARNING ACTIVITIES at home and so I brought it out again this year. Everything that you need for this ACTIVITY can be bought at DOLLAR TREE.


The HEART GEMS come in a bag like this and it is in the VALENTINE'S section.


Also in the VALENTINE'S section I found these two HEART shaped trays and put the HEART GEMS in them.


The ice cube tray you may have at home already but if not you can purchase one at DOLLAR TREE and they come two for a dollar. I then just took a SHARPIE black marker and wrote the numbers 1-14 on the inside bottom of the ice cube tray. I set up all the materials just like the picture above.


I asked Bri to tell me the number and then count out the HEART GEMS that went with that number. What was also great about this COUNTING ACTIVITY was that since we had two colors Bri decided she wanted to make a pattern with the colors so we also worked on patterns with this ACTIVITY as well.

This is a quick, easy, and fun MATH ACTIVITY to set up for your little ones. Let me know in the comments below any of your favorite or fun VALENTINE'S DAY MATH LEARNING ACTIVITY!

XOXO
RIA