Friday, February 26, 2016

DIY Dollar Tree Candle Decor


Hi everyone! I am back to share with you another "DIY Dollar Tree Project Idea". I know I have been doing a lot of Dollar Tree DIY and I never mentioned why. Well my husband and I are having our FIRST and ONLY house built and it will be our FOREVER HOME for us and our girls. So all of these DIY things I have been creating is for our new home. The one project that I will be sharing with you today is a "Candle Decor" project that I plan to put on the edges of our garden tub in the bathroom. But this "DIY Dollar Tree Candle Decor" can be use in other parts of the home and still look beautiful.


This is the vase that I found at Dollar Tree that I used for this project.


I also got this candle stick at Dollar Tree to make the Candle Decor taller.


To glue the candle stick and the vase together I used the E6000 glue. This glue (like I have said before) works great on glass projects.


This is how it look once I glued the vase and candle sticks together.


I wanted to add some color to this "Candle Decor" and also give the candle some height in the vase so I use these blue glass gems that I also got at Dollar Tree.


I put a toilet paper roll in the middle of the vase when I was putting the glass gems in so that I wouldn't need so many glass gems to get the height I wanted for the candle. (Sorry the picture was so dark, it was hard for me to get a good picture without a flash glare).


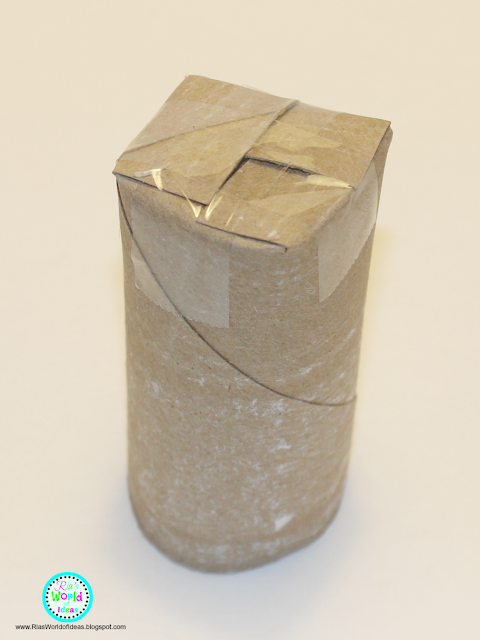
I then cut four slits in the toilet paper roll down to where the glass gems end so that I could fold it and tape it down.


I then took the toilet paper roll out and taped down the slits.


I then returned it back to the vase with the glass gems around it.


These are the candles that I used for this project and I also found them at Dollar Tree. I was going to use some taller candles I saw at Wal-Mart but I didn't like the look of how tall they were so I used these which was even better because these were just a dollar each and the ones at Wal-Mart were $3 each.


This is how they look. I can't wait to see how these will look in my bathroom on the garden tub. When I move into my house I will be having blog post on how I decorated and organize my house so stay tuned for those future post.

I hope you enjoyed this post.

Don't forget to LIKE, PIN, or SHARE this post if like it or found it helpful.

XOXO
RIA


Wednesday, February 17, 2016

DIY Dollar Tree Make up Brush Organizers


Hi everyone! I have another DIY Dollar Tree Organization project to show you guys today and it also has a little "Glam" added to it just like my "DIY Glam Dollar Tree Organization Decor" project that I did and posted before.


To see this post click here


When I was making my "DIY Dollar Tree Apothecary Jars" I used the lid of this jar that I got from Dollar Tree to use for the lids of my Apothecary Jars. The lid on this jar fit perfectly on the vases that I used to make the Apothecary Jars. Of course I was not going to let the jar without the lid go to wasted so I had some ideas in mind for them. One of the ideas was to use the open jars for my make up brushes. 


To see this post click here


I wanted to add some "Glam" to these make up brush organizers. I used the same diamond wrap ribbon on them that I used on my "Glam Organizer Decor".


I used the E6000 glue to glue the diamond wrap onto the jars. Now I have make up brush organizers to match my other "Glam" organizer Apothecary Jars. 


Another idea for using these jars without their lids is by making a Flower arrangement with things from Dollar Tree as well. I made this arrangement for my sister because she likes red.

I hope you enjoyed this post. Let me know in the comments below some ways that you like to organize your make up brushes or any other ideas you might have for these jars without their lids.

Don't forget to LIKE, PIN, or, SHARE this post if you like it and found it helpful.

XOXO
RIA


Sunday, February 14, 2016

DIY Glam Dollar Tree Organization Decor


Hello everyone! So earlier this month I shared with you guys a post on how I made Apothecary Jars out of Dollar Tree items.


To see this post click here.

Today I am going to share with you how I filled some of these jars I made for my "Glam Organization Decor".


These are the three Apothecary Jars that I made that I used for this project.


I found these pretty Glam looking ribbons at Dollar Tree and knew that they would look so pretty on the Jars.


I wanted each Jar to have different number of rows of sparkling ribbon so that they could be a little different from each other. So I cut the ribbon to make two rows and one row. For one of them I was going keep the the ribbon as it was with three rows but for the other two I would have two or one row of sparkle ribbon. 


I wanted to add a special touch to each middle of the ribbon on the Jars. I could not find any jewels or gems I liked at Dollar Tree, Hobby Lobby, or Michael's. Then I was at Wal-mart and saw these earrings and thought these would look beautiful on the jars.


I used these small Jewelry pliers to take off the hook on the earrings.


I used the smaller pliers to bend the back of the bigger earring to make a loop to loop onto the ribbon.


To glue all these things to the Jars I used E6000 glue which is great for glass projects. This glue also dries clear.

For the tall jar I glued the ribbon as it was and a diamond in the middle. For the second jar I liked the look of one row of  ribbon and the tangling diamonds on it. For the small jar I used two rows of sparkling ribbon and one diamond on it. I also put some sparkling ribbon on the lids as well.


After I finished decorating the jars I then filled them up with things I found at Dollar Tree, which were cotton balls, bath salts, and Q-tips. 


 I also made a green set of Apothecary Jars for my mom.


I filled her Jars with the same contents as well. 

 My mom and I put these jars in our bathrooms and not only do they function to ORGANIZE some of our bathroom contents but it also becomes bathroom DECOR because they look so pretty.

I hope you enjoyed this post. Don't forget to LIKE, PIN, or SHARE this post if you like it and found it helpful.

Also stay tune for future post were I will be sharing more ideas on how I used these Apothecary Jars in other parts of my house.

XOXO
RIA


Tuesday, February 9, 2016

Valentine's Day Sensory Box with Dollar Tree Items


I love making different kinds of Sensory Boxes to go with themes or the Holiday seasons for my girls. Sensory boxes are great things to make for your kiddos because not only will they have fun with them but it also helps them with their FINE MOTOR SKILLS in their hands that will help them with writing with a pencil or cutting with scissors when they go to school. By pouring and scooping things up in this sensory box, children work the muscle in their hands to help them in the future in school. I wanted to share with you  guys a Valentine's Day Sensory Box that I created for my girls with Dollar Tree Items.


The materials I used was a plastic tub, dry uncooked rice (but you can use white dry beans as well), heart measuring cups, and some Valentine's Day items. All the items pictured above I got at Dollar Tree.


I poured the rice first and then added the items I purchase at dollar tree.


I found some red plastic cups that I had and added it to the sensory box to go with the Valentine's Day theme. I also put in the heart gems and buried some in the rice so that Bri could explore to find them.


Then I let Bri have fun and explore with it. I did add some alphabet magnets one day to the sensory box and as she found them in the rice, I would ask her what letter it was and the sound it makes to practice letter recognition. Another day we practiced counting by counting the heart gems every time she put some in a cup. This sensory box not only helps with fine motor skills but it can be adapted in so many ways to teach other things as well to your kiddos.

What are some fun Valentine's Day theme learning activities do you do with your kiddos? Let me know in the comments below. 

Don't forget to LIKE, PIN, or SHARE this post if you liked it or if you found it helpful.

XOXO
RIA


Saturday, February 6, 2016

DIY Dollar Tree Mini Jewelry Organizer


Hello Everyone! As you know I love making my own things and if I can get all the materials to make something for free or at dollar tree than it makes me even more happier. Today I want to share with you a DIY Dollar Tree Mini Jewelry Organizer that I created just using Dollar Tree items.


The materials you will need is a 4x6 picture frame and a 6 pack of these long pink skinny hair rollers. You only need six rollers but I got two packs because I always like to have extra on hand just in case.


I wanted my picture frame to be gold so I spray painted it gold with some gold spray paint I already had at home. The dollar tree does sell gold picture frames but they didn't have any the day I went in to get my materials.


Then I took out the metal that was in the inside of the rollers.


Now it was time to glue. I was going to use hot glue but I decided to use E6000 instead because the hot glue would burn the foam rollers. I flipped the picture frame over and glued the rollers in onto the back of the frame.


I then took the paper that came with the frame and glued it on to the rollers to keep the rollers in place and have a bottom to the Jewelry Organizer. Make sure you glue the white side to the rollers so you don't see this picture through the rollers on the other side. 


Once the glue has dried, flip the picture frame over and this is the final result.


You could use these Jewelry Organizer for your rings or earring studs.

I hope you enjoyed this post and you found it helpful.

Please don't forget to LIKE, PIN, or SHARE this post if you found it helpful.

XOXO
RIA